The secret to epic castle photos isn’t avoiding wide-angle distortion, but learning to control it as a creative tool right from your phone.
- Perspective distortion—that ‘stretching’ at the edges—is a predictable optical effect you can use for dramatic storytelling.
- Keeping your phone perfectly parallel to the castle walls is the single most effective technique for achieving straight, architectural lines.
Recommendation: Stop fighting your lens by trying to ‘fix it in post’ and start directing it in-camera to capture the scene with intention.
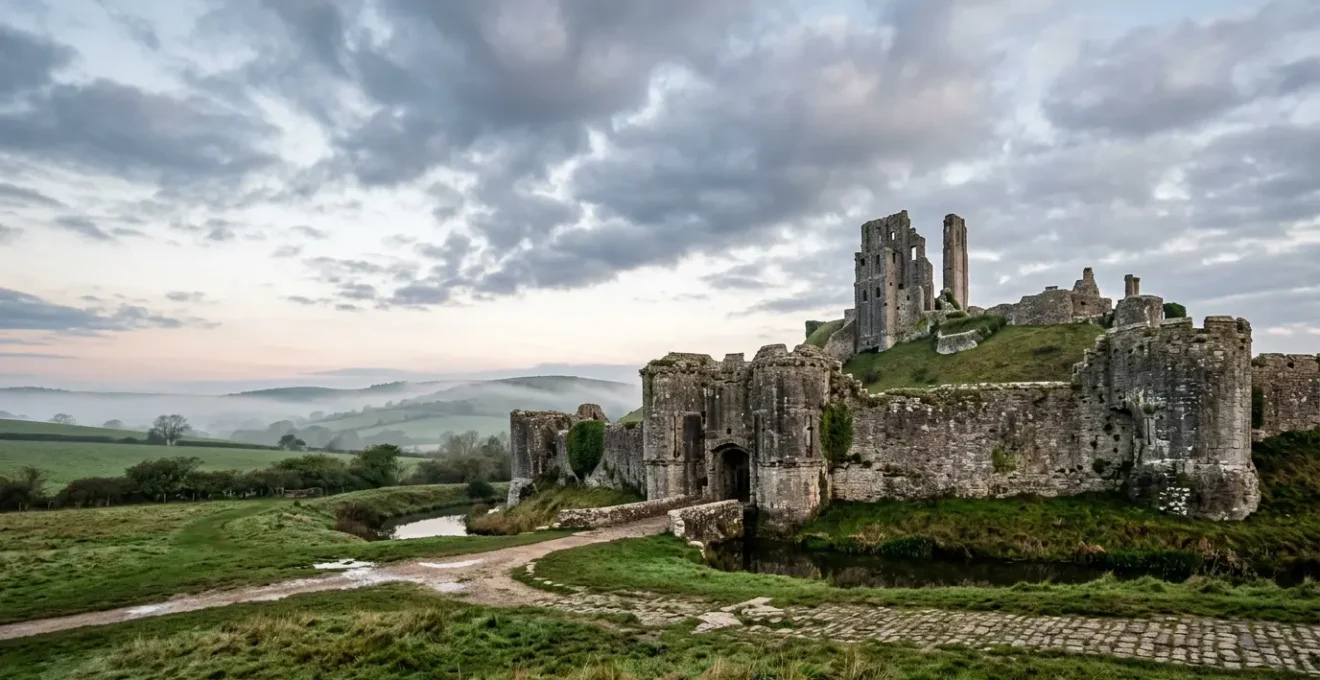
There are few things more frustrating for a heritage tourist than standing before a magnificent UK castle, trying to capture its grandeur, only to find the resulting photo is a mess of leaning towers and comically stretched walls. You wanted to frame the epic scale of Warwick Castle or the imposing presence of the Tower of London, but your phone’s wide-angle lens has turned it into a funhouse mirror. The common advice is often to « just step back » or « fix it in Lightroom later, » but what if that’s missing the point?
These approaches treat the lens as a problem to be solved, rather than a tool to be mastered. They ignore the incredible storytelling potential locked within that wide perspective. The truth is, the world’s best architectural photographers don’t just avoid distortion; they understand it, control it, and sometimes even embrace it. This isn’t about post-production tricks or buying expensive new gear. It’s about in-camera craft—simple, deliberate choices you make before you even press the shutter.
But what if the real key to professional-looking castle photography wasn’t about having the ‘perfect’ lens, but about knowing how to direct the ‘imperfect’ one that’s already in your pocket? What if you could learn to see perspective not as an error, but as a powerful compositional element? This guide will move beyond the generic tips and delve into the optical storytelling of wide-angle photography. We will explore why distortion happens, how to control it at the source, and when to use other techniques to truly capture the majesty of these historic structures.
This article will break down the essential techniques, from the physics of your lens to the practicalities of shooting in mixed lighting. You’ll learn the specific order of operations for focus and exposure, why 4K video offers more than just resolution, and how to use HDR to your advantage in high-contrast castle interiors. Here is a look at the specific skills we will cover.
Table of Contents: A Guide to Mastering Your Wide-Angle Lens at Heritage Sites
- Why do people on the edge of your group photo look stretched?
- How to use foreground interest to make wide landscapes look epic?
- Step back or Zoom out: when is the wide lens actually the wrong choice?
- The lens flare risk that occurs more often with wide-angle glass
- How to hold your phone to keep building lines straight in wide shots?
- What order to adjust focus and exposure for the perfect landscape shot?
- Why 4K videos look sharper even when watched on a 1080p screen?
- High Dynamic Range: How to Shoot Vlogs That Look Professional in Mixed Lighting?
Why do people on the edge of your group photo look stretched?
That strange, taffy-like stretching you see at the edges of a wide-angle photo isn’t a flaw in your phone; it’s a fundamental characteristic of how these lenses work. It’s called perspective distortion, and it happens because the lens has to capture a very wide field of view and project it onto a flat sensor. To do this, it exaggerates the relative size of objects. Anything closer to the lens appears much larger, and anything further away seems smaller. When you take a group photo and someone is at the very edge, their shoulder is physically closer to the lens than their head, causing it to look stretched and disproportionate.
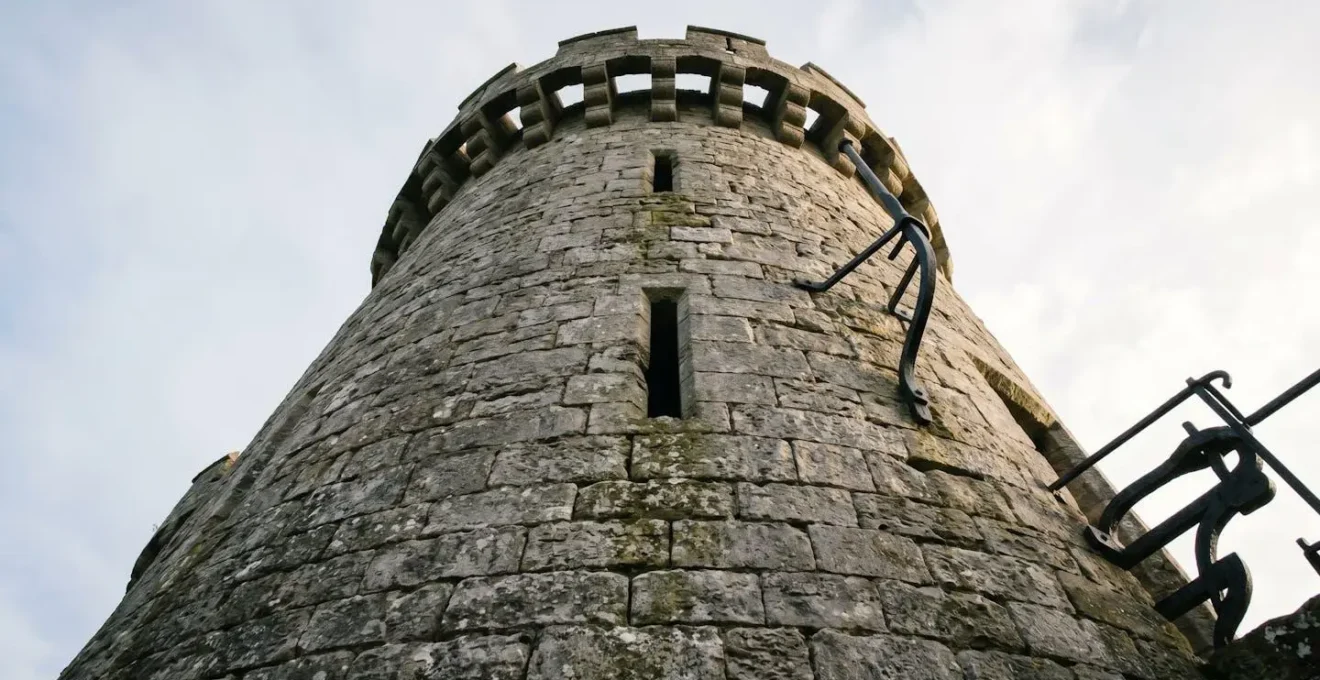
This same effect is what makes castle towers appear to lean backwards dramatically when you shoot from close and low. The top of the tower is much farther from your phone’s lens than the base, so the lens ‘shrinks’ the top relative to the bottom, creating converging vertical lines. There’s also barrel distortion, which is an optical effect where straight lines appear to curve outwards from the centre, like the staves of a barrel. Modern phones often correct for this automatically, but perspective distortion is purely a result of your position and angle.
Understanding this distinction is the first step to mastering your lens. Instead of seeing it as an error, think of it as an effect you can control. By changing your distance and angle, you can either minimize this distortion for a clean, architectural look or exaggerate it for a powerful, dynamic shot. It’s not about fixing it later; it’s about choosing the story you want the perspective to tell.
Your Action Plan: Diagnosing Wide-Angle Distortion
- Identify Distortion Type: First, assess the image. Are straight lines bowing outwards (Barrel Distortion) or are parallel lines like the edges of a tower converging (Perspective Distortion)? The first is optical, the second is about your camera’s position.
- Check Your Position: Are you level? Holding your phone perfectly level and parallel to your subject minimizes warping. Tilting the camera up or down is what creates those dramatic converging lines.
- Assess Subject Distance: How close are you? The stretching effect of a wide-angle lens becomes exponentially more extreme the closer you get to your subject. To reduce stretching on people at the edge, step back and zoom in slightly.
- Define Creative Intent: Is the distortion serving a purpose? Sometimes, the dramatic lean of a tower can convey its immense height and power. Decide if you want to keep this for effect or correct it for technical accuracy.
- Use Lens Correction Profiles: If you want to correct barrel distortion, software like Lightroom Mobile has built-in profiles that can automatically counteract the optical warping specific to your phone’s lens.
How to use foreground interest to make wide landscapes look epic?
One of the biggest challenges with wide-angle lenses is that they can make vast landscapes feel empty and distant. The very feature that gets the entire castle in the frame can also push it so far into the background that it loses its impact. The solution is to think in layers and use foreground interest to create a sense of depth and guide the viewer’s eye through the scene. A flat photo becomes a three-dimensional journey.
Instead of just pointing your phone at the castle, scout the immediate area for compelling elements to place in the bottom third of your frame. This could be a patch of wildflowers, a gnarled tree root, a weathered cobblestone path, or the reflection in a moat. According to a study on wide-angle architectural composition, incorporating these elements is crucial for creating a perception of space in a two-dimensional image. By positioning a contextual object between the camera and the main subject, you transform a simple snapshot into an engaging image with a narrative layer.
This technique does more than just fill empty space. It provides context, scale, and a starting point for the viewer’s eye. A winding path acts as a « leading line, » pulling the viewer from the foreground directly towards the castle in the background. A stone archway or the branch of an ancient yew tree can act as a natural frame, adding depth and focusing attention on the main subject. At a site like Bodiam Castle, using the moat’s reflection as a foreground element not only adds depth but also creates a beautiful, symmetrical composition. This is active, thoughtful photography, turning a simple tourist visit into an exercise in artistic composition.
Step back or Zoom out: when is the wide lens actually the wrong choice?
The ultra-wide lens is a powerful tool, but it’s not always the right one. The common tourist mistake is treating the « 0.5x » button as a magic wand to fit everything in, regardless of the consequences. Sometimes, the best way to photograph a tall castle tower without cutting it off isn’t to go wider, but to do the opposite: step back and use a standard or even a telephoto lens (zoomed in).
This is because of an effect called lens compression. While wide-angle lenses exaggerate distance and make things feel further apart, telephoto lenses compress space, making distant objects appear larger and closer in relation to the foreground. As lens distortion analysis shows, telephoto lenses (generally those above 85mm) are masters of this effect. By standing further away from the castle and zooming in, you can capture a tower with perfectly straight lines and make it look just as majestic, if not more so, than a distorted wide-angle shot taken from up close. This technique is perfect for isolating a specific architectural detail or capturing the castle against a dramatic sky.
But what if you physically can’t step back? If you’re in a tight courtyard at a site like the Tower of London, you can’t just retreat 100 metres. This is where a ‘Vertorama’ (Vertical Panorama) is your secret weapon. Instead of trying to get the whole tower in one wide shot, switch your phone to its standard lens, hold it vertically, and take a series of overlapping photos as you tilt the phone upwards. You can then use the panorama stitching function in your phone’s gallery or an app like Lightroom Mobile to merge them into a single, high-resolution image that captures the entire structure without any wide-angle distortion. This is the pro technique for tight spaces.
The lens flare risk that occurs more often with wide-angle glass
Shooting with a wide-angle lens means you’re capturing a massive slice of the world, which inevitably increases the chances of pointing it towards the sun or another bright light source. This leads to lens flare, those bright starbursts, circles, and washed-out ‘veils’ of light that can appear in your photos. While sometimes seen as a mistake, lens flare, like distortion, can be another creative tool in your arsenal if you learn to control it.
The reason wide-angle lenses are more susceptible is a matter of physics. Research on lens construction shows that wide-angle and ultra-wide lenses contain more internal glass elements (often 12-16) compared to standard lenses. Each of these surfaces provides an opportunity for light to bounce around internally, creating flare. This isn’t a sign of a cheap lens; it’s an inherent property of complex wide-angle optics.
Instead of just trying to avoid it, think about how you can use it. A controlled sun star, achieved by using a small aperture (like f/16) and partially hiding the sun behind a castle turret, can add a point of sparkling interest. A soft, veiling flare during golden hour can lend a dreamy, historical atmosphere to a shot of a ruined abbey. You can control the intensity of flare by how much of the light source you allow into the frame. If you want to eliminate it completely, the simplest trick is to use your hand as a makeshift lens hood, positioning it just outside the frame to block the direct rays of the sun from hitting your lens. This is a classic photographer’s trick that works just as well for a smartphone as it does for a DSLR.
How to hold your phone to keep building lines straight in wide shots?
While post-production apps can work wonders, the most powerful tool for getting straight lines in your castle photography is your own two hands and a single, simple principle: the ‘Plane Parallel Principle’. Imagine the back of your phone is a pane of glass. To get a building’s vertical lines to appear perfectly straight and parallel in your photo, you must hold your phone so its back is perfectly parallel to the face of the building wall. Any upward or downward tilt, no matter how slight, will cause those lines to converge and appear to lean.
This is the fundamental technique of architectural photography. When you get to a location, don’t just point and shoot. Take a moment to position yourself. Use your phone’s built-in grid lines as a guide. Line up the vertical grid lines with the vertical edges of the castle walls or towers. Your goal is to get the horizontal lines of the grid parallel with the ground and the vertical lines parallel with the building. It often means you need to find a vantage point further back and higher up to avoid tilting the phone upwards.
Of course, sometimes tilting is unavoidable or even desirable. An intentional low-angle shot, crouching down and pointing the phone up, can create a ‘power shot’ that emphasizes the height and intimidating nature of a castle gatehouse. If you do need to correct a tilted shot later, apps like Lightroom Mobile (using the ‘Upright’ tool) or the dedicated perspective correction app SKRWT are invaluable. They allow you to digitally ‘pull’ the converging lines back into a parallel position. But remember, the less you have to correct, the higher the final image quality will be. Getting it right in-camera is always the best strategy.
Your Action Plan: The Mobile Perspective Correction Workflow
- At the Shooting Stage: Apply the ‘Plane Parallel Principle’. Imagine your phone’s back must be perfectly parallel to the castle wall. Activate and use your camera’s built-in level or grid display to ensure vertical and horizontal lines are true.
- Post-Production App 1 (Lightroom Mobile): For quick fixes, use the ‘Upright’ tool’s ‘Auto’ or ‘Full’ correction. For fine-tuning, switch to the ‘Guided’ mode to manually draw lines on the image that you know should be vertical or horizontal.
- Post-Production App 2 (SKRWT): This is a specialist app for perspective. Use its horizontal and vertical keystone adjustment sliders to precisely correct converging lines, offering up to ±45 degrees of adjustment.
- The Creative Alternative (Intentional Power Shot): Instead of fighting the lean, embrace it. Crouch very low and tilt your phone upwards deliberately. This ‘hero’ angle exaggerates the converging verticals to make the castle look impossibly tall and powerful.
- Pro Tip for Corrections: If you know you’ll need to make an extreme correction in post-production, step back a few extra feet before taking the shot. This slightly reduces the initial angle of tilt, giving your correction software more image data to work with and resulting in a higher quality final image.
What order to adjust focus and exposure for the perfect landscape shot?
When faced with a complex scene like a sunlit castle wall against a bright, overcast sky, many mobile photographers tap randomly on the screen, hoping for the best. However, a deliberate, two-step process using your phone’s AE/AF (Auto Exposure/Auto Focus) Lock function will give you precise control and dramatically better results. The crucial rule is to set your focus first, then adjust exposure.
First, identify the most important element in your scene that needs to be perfectly sharp. In castle photography, this is often the texture of the stonework. A case study on architectural photography demonstrates that prioritizing focus on foreground textures before adjusting exposure creates far more impactful images. Tap and hold your finger on that detailed area of weathered stone until you see « AE/AF Lock » appear on the screen. This does two things: it locks the focus onto that exact spot, and it sets an initial exposure based on the brightness of that spot. The focus will now stay locked, even if you reframe the shot slightly.
Once focus is locked, you can fine-tune the exposure. A small sun icon or slider will appear next to the focus box. Without lifting your finger, you can now slide it up or down to make the entire scene brighter or darker. For a typical UK castle scene with a bright white sky, you’ll almost always want to slide the exposure down slightly (-0.3 to -1.0). This prevents the sky from becoming a washed-out white blob (« blowing out the highlights ») and deepens the shadows in the stonework, which in turn reveals more of that beautiful, craggy texture you just locked focus on. This two-step process—Lock Focus, Adjust Exposure—is the secret to moving from simple snapshots to intentional, professional-looking landscape photos.
Why 4K videos look sharper even when watched on a 1080p screen?
It might seem counterintuitive, but recording your castle walkthroughs in 4K resolution, even if you only plan to watch them on a standard 1080p (Full HD) phone or TV screen, results in a noticeably sharper and more detailed final video. This is due to a process called downsampling or ‘supersampling’. Think of it as starting with a much higher quality ingredient.
A 4K video frame contains 3840 x 2160 pixels, which is four times the number of pixels in a 1080p frame (1920 x 1080). When a 4K video is played on a 1080p screen, the device has to ‘squash’ all that extra information down to fit. In doing so, it uses the data from four pixels in the original file to determine the colour and brightness of each single pixel in the final display. Technical analysis of resolution benefits reveals that this process of averaging data from multiple pixels creates a more accurate and detailed final image, reducing noise and moiré patterns and making intricate details, like the mortar between ancient stones or the carvings on a gatehouse, appear significantly crisper.
Beyond pure sharpness, shooting in 4K gives you immense creative flexibility. It allows you to perform a ‘digital zoom’ or pan across your footage in post-production. You can start with a wide shot of the entire castle exterior and then smoothly zoom in to a specific window or turret, all without any visible loss in quality (as long as your final video is 1080p). It also gives your phone’s Electronic Image Stabilization (EIS) more data to work with, resulting in smoother, more cinematic ‘gliding’ shots as you walk across uneven castle grounds. Shooting in 4K is about future-proofing your memories and giving yourself more creative options.
Key Takeaways
- Control, Don’t Just Correct: The most powerful adjustments are made in-camera by controlling your position and angle, not by relying solely on post-production software.
- Think in Layers: Use foreground elements like paths, walls, or trees to create depth and guide the viewer’s eye, transforming a flat photo into a 3D story.
- The Right Lens for the Job: A wide-angle isn’t always the answer. Sometimes, stepping back and using a telephoto lens (zoom) will produce a more powerful and architecturally correct image.
High Dynamic Range: How to Shoot Vlogs That Look Professional in Mixed Lighting?
Castles are a nightmare for cameras. You’re often filming from a dark, shadowed interior—like a gatehouse or dungeon—while looking out into a brightly lit courtyard. A normal camera will force you to choose: either expose for your face and have the background be a completely white, blown-out mess, or expose for the beautiful view outside and have your face be a dark, unrecognizable silhouette. This is where High Dynamic Range (HDR) video becomes your most valuable ally.
HDR works by simultaneously capturing multiple images at different exposure levels (one dark, one medium, one bright) and instantly merging them into a single frame. This allows your phone to retain all the detail in the darkest shadows (your face in the archway) and the brightest highlights (the sunlit clouds in the sky) at the same time. When vlogging in a castle, this is the key to creating a professional-looking shot that feels balanced and cinematic, rather than like amateur security footage.
The trick is to use it with intention. Many phones have an ‘Auto HDR’ mode, but for best results, use a pro camera app (like Filmic Pro or ProCam) that gives you manual control. You don’t always want the HDR effect at 100% strength, which can sometimes look artificial and ‘overcooked’, especially on historic stone textures. Dialing the intensity back to 50-70% often yields a more natural, believable result. Use HDR when the contrast is extreme, and turn it off when you’re in evenly lit conditions to save battery and processing power. By mastering HDR, you can turn a challenging lighting situation into a dramatic, story-rich scene that captures the true atmosphere of the location.
Now that you understand the principles, the next step is to put them into practice. Head to your nearest National Trust or English Heritage site, and don’t just be a tourist—be a photographer. Experiment with these techniques and start capturing the castles of the UK not just as you see them, but as you want them to be seen.